Having a secure garage door is extremely important for safeguarding your home and belongings from any weather conditions and animals. A key component in ensuring its reliability is weather seals, which protect against inclement weather and help maintain a consistent internal temperature in your garage. By promptly replacing worn garage door weather stripping, you can prevent any potential damage to your home.
Step 1: Removing the Old Weather Seals
The first step in replacing garage door weather stripping is to remove the old seals from your garage door‘s frame. Grab your trusty hammer, pry bar, or flathead screwdriver, and get ready. Position your chosen tool under the edge of the weather seals and gently apply pressure away from your body. Watch as the end beneath the strip moves towards you, effortlessly lifting the nail and strip. This careful technique ensures a clean and damage-free removal, paving the way for a smooth replacement.
Step 2: Measuring and Cutting the New Weather Strips
The second step is to measure and cut your garage door weather stripping to match the size of your existing weather seals. Many weather strips come in convenient pre-cut sizes, ranging from seven to nine feet long. However, for complete precision, take out the tape measure and measure the length of your current weather seals. To save valuable time, simply lay your old weather seal on top of the new one and trace it with a pencil to mark the necessary length. Trim your seal to the required size using a hacksaw or a box cutter.
Step 3: Installing the New Weather Strips
To kick off the installation of your freshly measured and cut garage door weather stripping, start by connecting the top weather seal to the frame. As your garage door stays closed, align the weather sealing perfectly against the door and securely attach it using nails or screws. For added flexibility, you can fasten the nails halfway in to allow for adjustments.
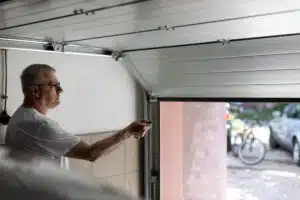
Step 4: Testing the Installation and Final Adjustments
The final step is attaching the side weather seals. Begin by pushing the ends of the side seal up to the corner, ensuring perfect contact with the top strip while keeping it clear from the ground. With confidence and excitement, press firmly against the door and secure the seal using nails that are halfway in. Repeat the process on the other side. Once everything is in place, test it by opening and closing the garage door to ensure it runs smoothly. After you’ve made any necessary adjustments, you can nail the seals in place thoroughly.
A proper garage door weather seals effectively protects your home from the elements, but they can wear out over time. By following this step-by-step guide, you’ll have your garage weather stripping replaced like a pro, ensuring security and energy efficiency for your home. Just remember to measure, cut, remove the old strips, and attach the new ones systematically, and you’ll have a new garage door seal in no time.
Need professional garage repair and service near Tampa? Bayside Garage Doors is here to lend a helping hand. Contact us at any of the following numbers for more information: 813-670-2087 (Hillsborough County), 352-405-1492 (Pasco & Hernando), 727-285-8171 (Pinellas County).